Wrap-around Shot
A shot that travels out-of-bounds can exhibit strange behaviors such as "wrapping around" to another part of the room. The exact behavior depends on the direction the shot is traveling, the layout of the room in memory, and quirks of the game's projectile collision detection. The most common application involves firing a beam shot diagonally off the far right side of a room to open a door that is on the far left side of a room.
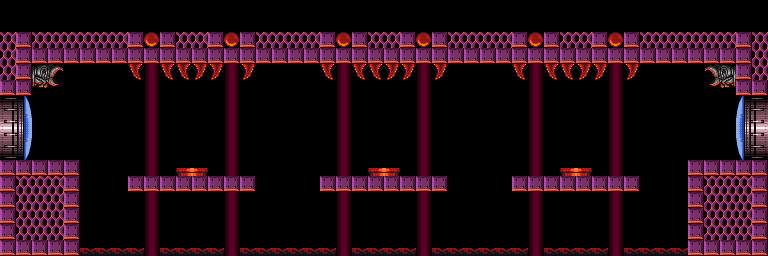
To understand wraparound shots it's helpful to know how room tiles are stored in memory. Every room is stored one row after another, in the same order that you read (English) text on a page: left-to-right then top-to-bottom. For example, consider the Plowerhouse Room:
The middle portion of the room is stored like this in memory:
If we can take advantage of a bug to "trick" the game into reading past the end of a row, it will therefore read from the beginning of the next row. This is the basic idea behind a wraparound shot.
Note that a shot will despawn once it goes fully offscreen, so wraparound shots require the front side of the beam to be out-of-bounds while the back side is onscreen. Naturally, this is easier with a longer beam, so enabling Spazer or Plasma or firing a charged shot may be required for some setups. Wave beam is always required to perform a wraparound shot, since a non-wave shot will collide with a wall before going out of bounds. Also note that a wraparound shot only interacts with tiles, and not enemies.
Contents
Right to Left Wraparound
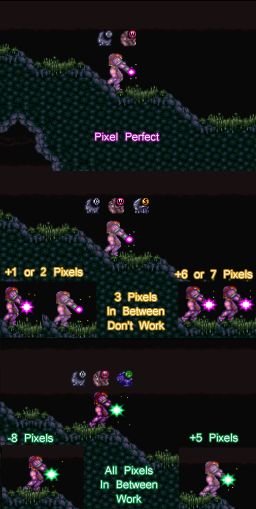
A shot that is traveling diagonally off the right side of the room will wrap around to the next row and interact with tiles on the left side of the room. This is commonly used to open doors in order to shinespark through them:
It experiences the most use in categories involving a large amount of item collection, such as 100% Items, 100% Map, and Reverse Boss Order. The two rooms where this is primarily performed are the Landing Site, to open the door leading to the Gauntlet Energy Tank so that Samus can shinespark through towards it, and Crocomire's Room, to open the door leading to his Power Bombs so that Samus can shinespark or Space Jump through towards it.
Beams disappear as soon as they are off-screen, so the beam must be at full width as it reaches the edge of the screen in order to trigger the door. You should hear the sound of the door opening if performed correctly.
Tutorials
- FrenchLightningJohn detailed tutorial on wrap-around for both NTSC and PAL
- WildAnaconda69 tutorial for Plasma wrap-around
- TarThoron's and antimatterhorse's image guide of the cues for the upper Landing Site wraparound, shown by beam combination.
Left Side Wraparound
A shot fired diagonally off the left edge of a room triggers an underflow that causes the shot to wrap around exactly 4095 tiles forward in memory, or 16 screens (minus one tile). The underflow affects the entire beam -- not just the off-screen portion -- so a sufficiently wide beam will interact with a few tiles further to the right as well. This only has an effect in sufficiently large rooms, as the shot has no effect if the underflow places it entirely beyond the room's tile data.
A left side wraparound can be used to open the door from Green Brinstar Main Shaft to Green Brinstar Beetom Room before falling all the way down the shaft. Since this room is 4 screens wide, shifting 16 screens forward in memory is equivalent to 4 screens downward. Therefore, a diagonal shot that passes through the red door to Green Brinstar Firefleas Room will hit the blue door at the bottom of the shaft.
Ceiling Wraparound
This is an extremely specific trick with very strange effects. It only works in rooms that are 8 screens wide (such as Frog Speedway or Crocomire's Room), and the beam shot must travel diagonally upwards through the ceiling on the right half of the room.
To understand its conditions and effects, it helps to look at the code. The bug lies within this routine, which checks for collisions between a projectile and all the tiles along its forward edge (i.e. the left edge if it's travelling left, or the right edge if it's travelling right).
;;; $A352: Beam horizontal block collision detection - wave beam ;;;
{
...
$94:A368 BD 78 0B    LDA $0B78,x; Load projectile Y position
$94:A36B 38          SEC
$94:A36C FD C8 0B    SBC $0BC8,x; Subtract projectile Y radius (to get the top edge)
$94:A36F 4A          LSR A
$94:A370 4A          LSR A
$94:A371 4A          LSR A
$94:A372 4A          LSR A      ; Divide by 16 to get Y position in tiles
$94:A373 E2 20       SEP #$20
$94:A375 8D 02 42    STA $4202  ; Set as multiplication operand A
$94:A378 AD A5 07    LDA $07A5  ; Load room size in tiles
$94:A37B 8D 03 42    STA $4203  ; Set as multiplication operand B
$94:A37E C2 20       REP #$20
...
$94:A38B BD 64 0B    LDA $0B64,x; Load projectile X position
...                             ; ... add/subtract X radius to get left/right edge
...                             ; depending on projectile direction of travel
$94:A3A6 4A          LSR A
$94:A3A7 4A          LSR A
$94:A3A8 4A          LSR A
$94:A3A9 4A          LSR A      ; Divide by 16 to get X position in tiles
$94:A3AA 18          CLC
$94:A3AB 6D 16 42    ADC $4216  ; A = (y tile * room width) + x tile
                                ; (i.e. the index of the tile in memory)
$94:A3AE 0A          ASL A      ; Each tile is 2 bytes, so multiply by 2 to get a byte offset
$94:A3AF A8          TAY
...
$94:A3CF BB          TYX

; Loop for each tile in the block span
$94:A3D0 20 B5 A1    JSR $A1B5  ; Handle interaction with the beam and this tile
$94:A3D3 8A          TXA
$94:A3D4 18          CLC
$94:A3D5 6D A5 07    ADC $07A5  ; Add 2*room width to advance to the next row down
$94:A3D8 6D A5 07    ADC $07A5  ; BUG
$94:A3DB AA          TAX
$94:A3DC C6 26       DEC $26
$94:A3DE 10 F0       BPL $F0    ; Loop until we reach the bottom of the beam

; All done, clean up and return
$94:A3E0 FA          PLX
$94:A3E1 AB          PLB
$94:A3E2 18          CLC
$94:A3E3 6B          RTL
}
If the projectile's Y position is -1, its tile Y position is computed as 0xFFF. This truncated to 0xFF before multiplying by the room width, which is 0x80 for an 8-screen-wide room. The result of the multiplication is 0x7f80; we then add the projectile's X position in tiles and multiply by 2 to get a byte index of A = (0xFF00 + X*2). This is an entirely nonsensical value, and the collision-handling routine at $A1B5 recognizes this as out-of-bounds and does nothing.
However, when we add the room width to advance to the next row, things get weird. If the tile X coordinate is greater than 0x40 (so A is 0xFF80 or greater), the first ADC instruction overflows to an in-bounds value and sets the carry flag -- which causes the second ADC (the line marked BUG) to add an extra 1 (since the developers didn't bother to reset the carry flag as they didn't expect this to ever overflow). Since each tile is 2 bytes, this extra byte offset causes the code to end up misaligned in the tile data and incorrectly interpret part of the tile graphics data as block type information.
The only known application of this is the Speedless Speedway technique to traverse Frog Speedway right-to-left without speed booster. Exploiting this bug in Frog Speedway causes the routine to interpret tile graphics data in the ceiling as a large number of respawning shot blocks, which can be used to overload PLMs.

