Difference between revisions of "Construction Zone"
From A complete guide to Super Metroid speedrunning
m |
m |
||
| (4 intermediate revisions by 2 users not shown) | |||
| Line 1: | Line 1: | ||
| + | {{Infobox room | ||
| + | |zone = Brinstar | ||
| + | |subzone = Blue | ||
| + | }} | ||
{{Adjacent rooms | {{Adjacent rooms | ||
|west=[[Morph Ball Room]]<br/>[[First Missile Room]] | |west=[[Morph Ball Room]]<br/>[[First Missile Room]] | ||
| Line 6: | Line 10: | ||
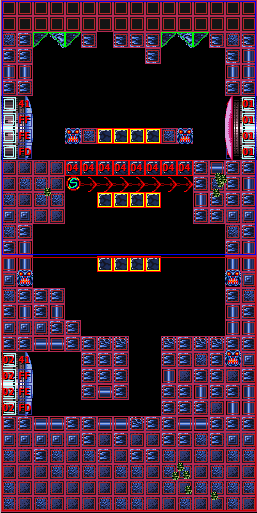
[[File:ConstructionZone.png]] | [[File:ConstructionZone.png]] | ||
| − | = Enemies = | + | == Early Game == |
| + | |||
| + | On the way down, one of the faster strats is involves downbacking through the middle section while firing two shots to clear blocks out of your way. | ||
| + | |||
| + | {{#ev:youtube|CvbDOAUSITk}} | ||
| + | |||
| + | An easier strat is to bounceball off the ledge, allowing you to fall down to the bottom before landing a second time. | ||
| + | |||
| + | {{#ev:youtube|-4fq442fqCE}} | ||
| + | |||
| + | On the way back up shooting a shot between the two rows of blocks will break both, allowing you to jump-morph into the gap. | ||
| + | |||
| + | {{#ev:youtube|AJ6TVofkC2U}} | ||
| + | |||
| + | == Enemies == | ||
* [[Geemer (blue)|Geemer]] | * [[Geemer (blue)|Geemer]] | ||
| + | |||
| + | [[Category:Rooms in Old Brinstar]] | ||
Latest revision as of 07:44, 26 November 2023
| Construction Zone | |
|---|---|
| Zone | Brinstar |
| Subzone | Brinstar/Blue |
| Morph Ball Room First Missile Room |
Adjacent rooms | Blue Brinstar Energy Tank Room |
|---|---|---|
Early Game
On the way down, one of the faster strats is involves downbacking through the middle section while firing two shots to clear blocks out of your way.
An easier strat is to bounceball off the ledge, allowing you to fall down to the bottom before landing a second time.
On the way back up shooting a shot between the two rows of blocks will break both, allowing you to jump-morph into the gap.
