Difference between revisions of "Bubble Mountain"
(→KPDR After Wave) |
m |
||
| (11 intermediate revisions by 3 users not shown) | |||
| Line 1: | Line 1: | ||
| + | {{Infobox room | ||
| + | |zone = Norfair | ||
| + | |subzone = East | ||
| + | |visible = 1 | ||
| + | }} | ||
{{Adjacent rooms | {{Adjacent rooms | ||
|west=[[Green Bubbles Missile Room]]<br/>[[Bubble Mountain Save Room]]<br/>[[Rising Tide]]<br/>[[Upper Norfair Farming Room]] | |west=[[Green Bubbles Missile Room]]<br/>[[Bubble Mountain Save Room]]<br/>[[Rising Tide]]<br/>[[Upper Norfair Farming Room]] | ||
| Line 17: | Line 22: | ||
==== Cac Snipe ==== | ==== Cac Snipe ==== | ||
| − | The Cac Snipe strat uses a charged angle shot to kill King Cac and | + | The Cac Snipe strat uses a charged angle shot to kill King Cac and leaves the drop for collection after wall jumping up. |
Starting the charge in the previous room is helpful, as it allows for fully charged spin jumps after entry. It is also important to run and jump immediately after firing your beam so that the shot remains on-screen the entire time. | Starting the charge in the previous room is helpful, as it allows for fully charged spin jumps after entry. It is also important to run and jump immediately after firing your beam so that the shot remains on-screen the entire time. | ||
| − | {{#ev:youtube| | + | {{#ev:youtube|3SvPtSiG-Jw}} |
==== Pseudoscrew ==== | ==== Pseudoscrew ==== | ||
| Line 29: | Line 34: | ||
NOTE: While a pseudoscrew provides immunity from projectiles and destroys weaker enemies, unspinning briefly after a wall jump can leave Samus vulnerable. Wall jumping low and spinning high over the top is a safer play. | NOTE: While a pseudoscrew provides immunity from projectiles and destroys weaker enemies, unspinning briefly after a wall jump can leave Samus vulnerable. Wall jumping low and spinning high over the top is a safer play. | ||
| − | {{#ev:youtube| | + | {{#ev:youtube|MTF2MbN5iYM}} |
=== Right Side Climb === | === Right Side Climb === | ||
| Line 47: | Line 52: | ||
Aim down fixes the transition but the bottom waver near the Last Norfair Missile of 100% causes extra lag, so it isn't advised. | Aim down fixes the transition but the bottom waver near the Last Norfair Missile of 100% causes extra lag, so it isn't advised. | ||
| − | ==== | + | ==== After Wave Beam (KPDR) ==== |
Entering with a charged beam, a single shot is used to kill King Cac and collect the drop before falling into the morph maze below. This strat can also be performed with a moonfall or a much more difficult bomb spread. | Entering with a charged beam, a single shot is used to kill King Cac and collect the drop before falling into the morph maze below. This strat can also be performed with a moonfall or a much more difficult bomb spread. | ||
| Line 53: | Line 58: | ||
{{#ev:youtube|7HpIgSfzD2k}} | {{#ev:youtube|7HpIgSfzD2k}} | ||
| − | ==== | + | ==== Final Visit (KPDR) ==== |
| − | Returning from Lower Norfair this time, a power bomb is used to avoid travelling through the morph ball maze. This introduces lag, which can be reduced or eliminated by killing wavers on the way down. | + | Returning from Lower Norfair this time, a power bomb is used to avoid travelling through the morph ball maze. This introduces lag, which can be reduced or eliminated by killing wavers on the way down. There are 2-farm and 3-farm variants, depending on where the power bomb is placed and how the bottom Sova is killed. |
| − | {{#ev:youtube| | + | {{#ev:youtube|NVNHgdZ4fYM}} |
== 100% == | == 100% == | ||
| Line 68: | Line 73: | ||
== Randomizer == | == Randomizer == | ||
| + | |||
| + | Without Hi-Jump, the easiest way to climb Bubble Mountain is a running jump from the [[Bubble Mountain Save Room]]. Note that if you have Speed Booster, it should be turned off so that you get maximum jump height. | ||
| + | |||
| + | {{#ev:youtube|_u8TX5Izpi0}} | ||
To get to the [[Green Bubbles Missile Room]], the fastest method from the [[Bat Cave]] is a damage boost from the waver. | To get to the [[Green Bubbles Missile Room]], the fastest method from the [[Bat Cave]] is a damage boost from the waver. | ||
Latest revision as of 03:25, 28 November 2023
| Bubble Mountain | |||
|---|---|---|---|
| Zone | Norfair | ||
| Subzone | Norfair/East | ||
| Items |
| ||
| Green Bubbles Missile Room Bubble Mountain Save Room Rising Tide Upper Norfair Farming Room |
Adjacent rooms | Bat Cave Single Chamber |
|---|---|---|
| Purple Shaft |
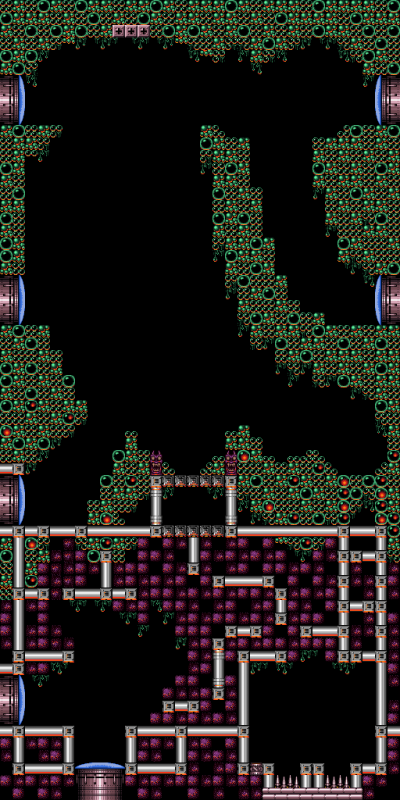
Stationed here, the most evil mini-boss of the game. King Cacatac and his machine gun!
Contents
Any%
Left Side Climb
The left side ascent for KPDR involves a running jump across into wall jumps. Getting up and over cleanly is an important part of speed runs, due to the time loss incurred by falling down.
Cac Snipe
The Cac Snipe strat uses a charged angle shot to kill King Cac and leaves the drop for collection after wall jumping up.
Starting the charge in the previous room is helpful, as it allows for fully charged spin jumps after entry. It is also important to run and jump immediately after firing your beam so that the shot remains on-screen the entire time.
Pseudoscrew
The Pseudoscrew strat involves charging a shot fully before making the jump across from the save room door. Like any pseudoscrew, it is necessary to release the shot input in order to remain spinning after a wall jump.
NOTE: While a pseudoscrew provides immunity from projectiles and destroys weaker enemies, unspinning briefly after a wall jump can leave Samus vulnerable. Wall jumping low and spinning high over the top is a safer play.
Right Side Climb
The standard ascent goes up the left side, but the right side is slightly faster. It's much more difficult, but in PRKD this is helped by Ice Beam allowing you to backup by freezing the Waver to use as a platform.
Revisits
Leaving Bat Cave to Single Chamber
Aim down fixes the transition but the bottom waver near the Last Norfair Missile of 100% causes extra lag, so it isn't advised.
After Wave Beam (KPDR)
Entering with a charged beam, a single shot is used to kill King Cac and collect the drop before falling into the morph maze below. This strat can also be performed with a moonfall or a much more difficult bomb spread.
Final Visit (KPDR)
Returning from Lower Norfair this time, a power bomb is used to avoid travelling through the morph ball maze. This introduces lag, which can be reduced or eliminated by killing wavers on the way down. There are 2-farm and 3-farm variants, depending on where the power bomb is placed and how the bottom Sova is killed.
100%
This strat will kill King Cac so he can't knock you down.
This variation can give you an extra drop:
Randomizer
Without Hi-Jump, the easiest way to climb Bubble Mountain is a running jump from the Bubble Mountain Save Room. Note that if you have Speed Booster, it should be turned off so that you get maximum jump height.
To get to the Green Bubbles Missile Room, the fastest method from the Bat Cave is a damage boost from the waver.
You can also do an Infinite Bomb Jump, or a delayed walljump, as shown here.
Technically it's also possible to jump from the right side to the left, but the window for this jump is small, so it's likely TAS-only.
Handling King Cac
There are various methods for dealing with King Cacatac when ascending Bubble Mountain. Because the time loss for falling down is significant, some precautions may be necessary to avoid being knocked down.
- Kill The Pest!
- Use a beam from the left side platform, such as the diagonal hero shot shown in the Cac Snipe strat
- Shoot a missile on the way up from the final wall jump
- Morph - On the final wall jump, morph and hold right, so that any damage knocks Samus up to safety rather than back down to the bottom
- Pseudoscrew - Charge a shot fully before wall jumping, as used in the Pseudoscrew strat above
NOTES:
- CAC PUFFS - Watch for a "puff" visual. If King Cac puffs up, it may be necessary to perform additional wall jumps to avoid taking a spike hit
- CONGESTION - The speed of the entry & climb can make a notable difference in where wavers are located. Certain timings can lead to "congestion" between King Cac, waver(s), and spike projectiles, which can make the ascension difficult to complete without falling back down

