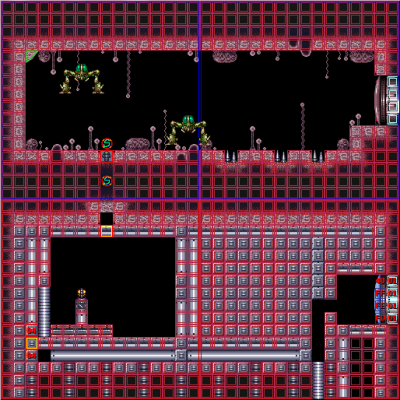
Difference between revisions of "Pink Brinstar Power Bomb Room"
From A complete guide to Super Metroid speedrunning
(Adding description for Mission Impossible strat) |
m |
||
| (2 intermediate revisions by 2 users not shown) | |||
| Line 1: | Line 1: | ||
| + | {{Infobox room | ||
| + | |zone = Brinstar | ||
| + | |subzone = Pink | ||
| + | |visible = 1 | ||
| + | }} | ||
{{Adjacent rooms | {{Adjacent rooms | ||
|east=[[Big Pink]] | |east=[[Big Pink]] | ||
| Line 10: | Line 15: | ||
A common strategy for [[100%]] is to [[Quick Drop]] through the crumble block, grab the Power Bomb, then spin-jump through the hole in the ceiling before the crumble block reforms, and wall jump the rest of the way up. Due to the tight window, this strat is known as "Mission: Impossible". | A common strategy for [[100%]] is to [[Quick Drop]] through the crumble block, grab the Power Bomb, then spin-jump through the hole in the ceiling before the crumble block reforms, and wall jump the rest of the way up. Due to the tight window, this strat is known as "Mission: Impossible". | ||
| + | |||
| + | [https://www.twitch.tv/videos/187112455 Tutorial by TrueMoss] | ||
= Enemies = | = Enemies = | ||
Latest revision as of 08:04, 26 November 2023
| Pink Brinstar Power Bomb Room | |||
|---|---|---|---|
| Zone | Brinstar | ||
| Subzone | Brinstar/Pink | ||
| Items |
| ||
| Adjacent rooms | Big Pink | |
|---|---|---|
One of two rooms where after entering from a previous room (in this case, Big Pink), the door leading to that room will already be closed before the transition has completed. However, this only occurs if this room is revisited after unlocking the upper door by destroying the two Sidehoppers. The other room where this occurs is Halfie Climb Room.
100%
A common strategy for 100% is to Quick Drop through the crumble block, grab the Power Bomb, then spin-jump through the hole in the ceiling before the crumble block reforms, and wall jump the rest of the way up. Due to the tight window, this strat is known as "Mission: Impossible".
