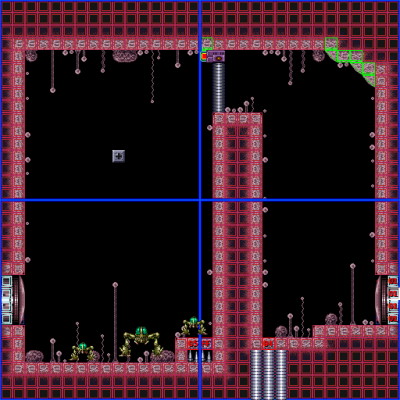
Pink Brinstar Hopper Room
| Pink Brinstar Hopper Room | |
|---|---|
| Zone | Brinstar |
| Subzone | Brinstar/Pink |
| Theme | Brinstar/Pink |
| Big Pink | Adjacent rooms | Wave Gate Energy Tank Room |
|---|---|---|
This is commonly referred to as Pink Brinstar Wave Gate Room.
Contents
Options to open the gate
The intended strategy to traverse this room from left to right to obtain the Energy Tank in the Hoptank Room is to get up to the pillar (Walljumping is sufficient even though the intention is to use Grappling Beam to get up there hence the grapple block) and shoot open the gate by using Wave Beam.
However there is a workaround that only requires a Super Missile. The idea is similiar to a normal traditional Gate Glitch. Accelerating a Super Missile fast enough relative to its position to the gate to push it through the actual gate and into the sensor to open the gate from the other side. This is obviously not intended and even for the classic Gate Glitch a special case since that is usually only possible if the sensor is on the left.
Following are videos showing the setup for the trick and its execution. Note that there are different setups for both with and without Hi-Jump Boots and that generally speaking, performing that trick with it is easier:
Gate Glitch with Hi-Jump
This method is arguably the easiest. As with all methods you have to allign Samus´ back with the wall which can be done by Moonwalking, Damage-knockback, Morphball-Turnaround etc. , then jump up and shoot at the right time as shown in the video. Two good visual cues people use are Samus´ center being at the upper doorframe and/or Samus´ head touching the little pink mushroom above the doorframe. Thoose same visual cues can be used for the Hi-Jumpless methods aswell even though the setup is different as shown below.
Gate Glitch without Hi-Jump
Intuitive indoor setup demonstrated by lildingus.
Normalized indoor setup demonstrated by matrick2298.
The idea behind both of theese setups is similiar to the Hi-Jump setup. You still have to perfectly allign with the wall and shoot with just enough acceleration at the right spot. However due to the lack of jump height a ground setup is not possible. That is the reason why you have to jump out of the door to make up for the lack of Hi-Jump Boots. However since you still need to be pixelperfectly alligned with the wall you need to do that allignment out of a jump which is considerably more difficult, yet with enough practice can be very consistent. The first video shows how that jump is done intuitively by only slightly tapping right after the jump out of the doorframe. The second video describes in all detail how to normalize that setup with turanround jumps. Both setups have their difficultys, however method 2 is probably generaly speaking more consistent due to the normalisation.
As the second video shows, if you have moonwalk enabled, this is the easiest way to align Samus' back against the wall.
The timing for the shot is not different from the Hi-Jump Boots method.
The gate can also be opened with a horizontal super, but there as there is no normalized setup for this, there is no reason to choose this method over the above methods.
