Difference between revisions of "Below Spazer"
(Randomizer softlock category) |
(Video for the door bonk setup of Alpha Spark) |
||
| Line 7: | Line 7: | ||
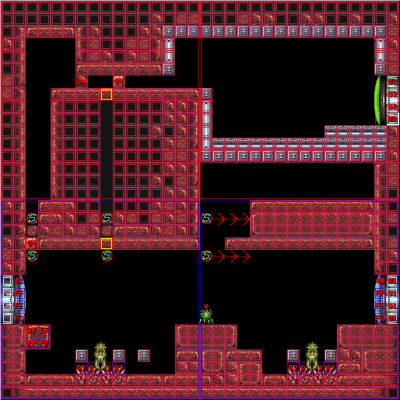
If you become attached to one of the Yapping Maws without [[Hi-Jump Boots]], you will need to [[spinjump]] to escape, as normal jumps will not work. Alternatively, a [[Hitbox Manipulation#Down-grabbing|crouch jump into a downgrab]] should also work if you can pull it off while you still have invulnerability from the spikes. | If you become attached to one of the Yapping Maws without [[Hi-Jump Boots]], you will need to [[spinjump]] to escape, as normal jumps will not work. Alternatively, a [[Hitbox Manipulation#Down-grabbing|crouch jump into a downgrab]] should also work if you can pull it off while you still have invulnerability from the spikes. | ||
| + | |||
| + | = Alpha Spark = | ||
If you have [[Speed Booster]] and are heading left instead of right, you can charge a [[shinespark]] in the previous room to shinespark through half of this room and Bat Room. This is referred to as the "alpha spark" as it is the first shinespark that a run of [[Any%|Any% KPDR]] can use to save time. | If you have [[Speed Booster]] and are heading left instead of right, you can charge a [[shinespark]] in the previous room to shinespark through half of this room and Bat Room. This is referred to as the "alpha spark" as it is the first shinespark that a run of [[Any%|Any% KPDR]] can use to save time. | ||
A typical sequence (assuming [[Wave Beam]] or similar) is to fire at the Cacatac in the middle once, jump towards its location, fire at the Cacatac again before landing to kill it, opening the door, and shinesparking through. | A typical sequence (assuming [[Wave Beam]] or similar) is to fire at the Cacatac in the middle once, jump towards its location, fire at the Cacatac again before landing to kill it, opening the door, and shinesparking through. | ||
| + | |||
| + | The setup in this video is a bit slower than optimal, but is consistent: if you bonk the door after the elevator, you can continue holding Dash, and avoid bonking the second door without stutters or taps. Then you can charge the shinespark after the halfway point of [[West Tunnel]]. | ||
| + | |||
| + | {{#ev:youtube|KiZsW5JFoNI}} | ||
= Enemies = | = Enemies = | ||
Revision as of 14:48, 20 June 2019
| Bat Room | Adjacent rooms | Spazer Room West Tunnel |
|---|---|---|
If you become attached to one of the Yapping Maws without Hi-Jump Boots, you will need to spinjump to escape, as normal jumps will not work. Alternatively, a crouch jump into a downgrab should also work if you can pull it off while you still have invulnerability from the spikes.
Alpha Spark
If you have Speed Booster and are heading left instead of right, you can charge a shinespark in the previous room to shinespark through half of this room and Bat Room. This is referred to as the "alpha spark" as it is the first shinespark that a run of Any% KPDR can use to save time.
A typical sequence (assuming Wave Beam or similar) is to fire at the Cacatac in the middle once, jump towards its location, fire at the Cacatac again before landing to kill it, opening the door, and shinesparking through.
The setup in this video is a bit slower than optimal, but is consistent: if you bonk the door after the elevator, you can continue holding Dash, and avoid bonking the second door without stutters or taps. Then you can charge the shinespark after the halfway point of West Tunnel.
