Difference between revisions of "Pit Room"
m (Fix embed syntax) |
m |
||
| (6 intermediate revisions by 2 users not shown) | |||
| Line 1: | Line 1: | ||
| + | {{Infobox room | ||
| + | |zone = Crateria | ||
| + | |subzone = Central | ||
| + | |visible = 1 | ||
| + | }} | ||
{{Adjacent rooms | {{Adjacent rooms | ||
|west=[[Climb]] | |west=[[Climb]] | ||
| Line 7: | Line 12: | ||
== Early Game == | == Early Game == | ||
| + | |||
| + | One option for crossing the pits is to [[gap skip]] each of the gaps between platforms. This is slower than jumping each of them optimally, but may be more consistent for some runners. | ||
| + | |||
| + | {{#ev:youtube|kBR-Tgz6dTg}} | ||
While entering this room on the way back up, you can hold Shot and Up, and you will kill the standing pirate in front of you, and the ceiling pirate above you. | While entering this room on the way back up, you can hold Shot and Up, and you will kill the standing pirate in front of you, and the ceiling pirate above you. | ||
| Line 15: | Line 24: | ||
The fastest strat also incorporates a [[damage boost]] off of a shot from the third pirate onto its platform. | The fastest strat also incorporates a [[damage boost]] off of a shot from the third pirate onto its platform. | ||
| + | |||
| + | {{#ev:youtube|yfiT6t6TgBc}} | ||
== 100% == | == 100% == | ||
| − | If you enter this room spinjumping with a shinespark charged, you can hold Up or Angle Up to activate the spark, then let go, hold Left, then press Jump to spark across the room. Then after the spark crashes, you can hold jump, then press and hold Right after you hit the ground. This gives a normalized setup to Screw Attack through the bomb blocks. | + | If you enter this room spinjumping with a shinespark charged, you can hold Up or Angle Up to activate the spark, then let go, hold Left, then press Jump to spark across the room. Then after the spark crashes, you can hold jump, then press and hold Right after you hit the ground. This autospinjump gives a [[Normalized Movement|normalized]] setup to Screw Attack through the bomb blocks. |
| + | |||
| + | {{#ev:youtube|9b62DkQokFw}} | ||
== Randomizer == | == Randomizer == | ||
| Line 35: | Line 48: | ||
* [[List of Missiles#Crateria 3|Crateria Missile 3]] | * [[List of Missiles#Crateria 3|Crateria Missile 3]] | ||
| + | |||
| + | [[Category:Rooms in Old Brinstar]] | ||
Latest revision as of 05:20, 25 November 2023
| Pit Room | |||
|---|---|---|---|
| Zone | Crateria | ||
| Subzone | Crateria/Central | ||
| Items |
| ||
| Climb | Adjacent rooms | Elevator to Morph Ball Room |
|---|---|---|
Contents
Early Game
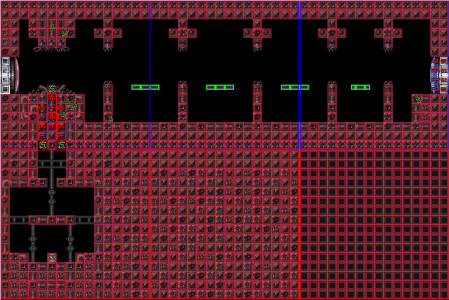
One option for crossing the pits is to gap skip each of the gaps between platforms. This is slower than jumping each of them optimally, but may be more consistent for some runners.
While entering this room on the way back up, you can hold Shot and Up, and you will kill the standing pirate in front of you, and the ceiling pirate above you.
More advanced strats will shoot the pirate in front of you then jump to its platform, before turning around and shooting the wall pirate.
The fastest strat also incorporates a damage boost off of a shot from the third pirate onto its platform.
100%
If you enter this room spinjumping with a shinespark charged, you can hold Up or Angle Up to activate the spark, then let go, hold Left, then press Jump to spark across the room. Then after the spark crashes, you can hold jump, then press and hold Right after you hit the ground. This autospinjump gives a normalized setup to Screw Attack through the bomb blocks.
Randomizer
It's possible to visit the missile location in this room with only Speed Booster. Start a short charge in The Climb, then charge it as you fall down into the hole. After you land, shinespark to the right.
