Difference between revisions of "Landing Site"
(→100%: Risk of doorskip) |
(→100%: Getting back in-bounds after doorskip) |
||
| (9 intermediate revisions by 3 users not shown) | |||
| Line 1: | Line 1: | ||
| + | {{Infobox room | ||
| + | |zone = Crateria | ||
| + | |subzone = Central | ||
| + | |theme = Crateria/Outside | ||
| + | }} | ||
{{Adjacent rooms | {{Adjacent rooms | ||
|west=[[Gauntlet Entrance]]<br/>[[Parlor and Alcatraz]] | |west=[[Gauntlet Entrance]]<br/>[[Parlor and Alcatraz]] | ||
| + | |north=[[Ceres Elevator Room]] | ||
|east=[[Crateria Power Bomb Room]]<br/>[[Crateria Tube]] | |east=[[Crateria Power Bomb Room]]<br/>[[Crateria Tube]] | ||
}} | }} | ||
[[File:LandingSite.png|x600px]] | [[File:LandingSite.png|x600px]] | ||
| + | |||
| + | At most save points, the game is saved as soon as you click "Yes" on the save menu. However, when saving at the ship, you need to wait until after you clear the "Save Completed" text box before resetting. | ||
== Early Game == | == Early Game == | ||
| Line 18: | Line 26: | ||
{{#ev:youtube|t6Tmu8w9yIQ}} | {{#ev:youtube|t6Tmu8w9yIQ}} | ||
| − | If you need to pause during the | + | You need around 230-240 health to comfortably clear the Gauntlet Spark. Dropping straight down from the ledge, 228 will end the spark just after breaking the last set of bomb blocks, 234 will align you for the short charge into the next room, and 240 will put you right next to the door if you're not going for the spark. If your health is not optimal for the endpoint you want, you can adjust your starting point forwards or backwards as needed. |
| + | |||
| + | If you need to pause during the spark in order to manually activate reserves, you will want to do it early in the spark, or before sparking. Pausing late in the spark could risk going Out of Bounds due to a [[Doorskip]]. | ||
| + | |||
| + | {{#ev:youtube|9_Inia63LS4}} | ||
| + | |||
| + | If you do accidentally go [[Out of Bounds]] here, you can get back in-bounds using this method, which uses similar route through this room as [[GT Spacetime]]. | ||
| + | |||
| + | {{#ev:youtube|jLs5UPTKWgs}} | ||
| + | |||
| + | == [[Any% Glitched]] == | ||
| + | |||
| + | After [[X-Ray Climb|X-Ray Climbing]] to get [[Out of Bounds]], you will need to navigate to a certain point to activate X-Ray for the purpose of setting the Escape flag. This video shows the route typically taken for this category. | ||
| + | |||
| + | {{#ev:youtube|kb4GjC4AQEw}} | ||
| + | |||
| + | == Trivia == | ||
| + | |||
| + | During [https://www.twitch.tv/videos/1099925976 this race] dueDillyQueen noticed in chat that the rain is moving opposite directions for the two runners. PJBoy investigated this and found it depends on RNG: the rain's X speed is randomly set to -6, -4, or 6. | ||
Latest revision as of 21:39, 24 December 2023
| Landing Site | |
|---|---|
| Zone | Crateria |
| Subzone | Crateria/Central |
| Theme | Crateria/Outside |
| Ceres Elevator Room | ||
| Gauntlet Entrance Parlor and Alcatraz |
Adjacent rooms | Crateria Power Bomb Room Crateria Tube |
|---|---|---|
At most save points, the game is saved as soon as you click "Yes" on the save menu. However, when saving at the ship, you need to wait until after you clear the "Save Completed" text box before resetting.
Contents
Early Game
Run to the left after you regain control of Samus. Avoid arm pumping on any of the downward slopes here, since there's a decent chance you'll fall off of the slopes if you do. Fire a shot angled up when you're near the end of the low, flat section before the door. You'll also need to limit arm pumping after firing the shot, to avoid bonking the door.
100%
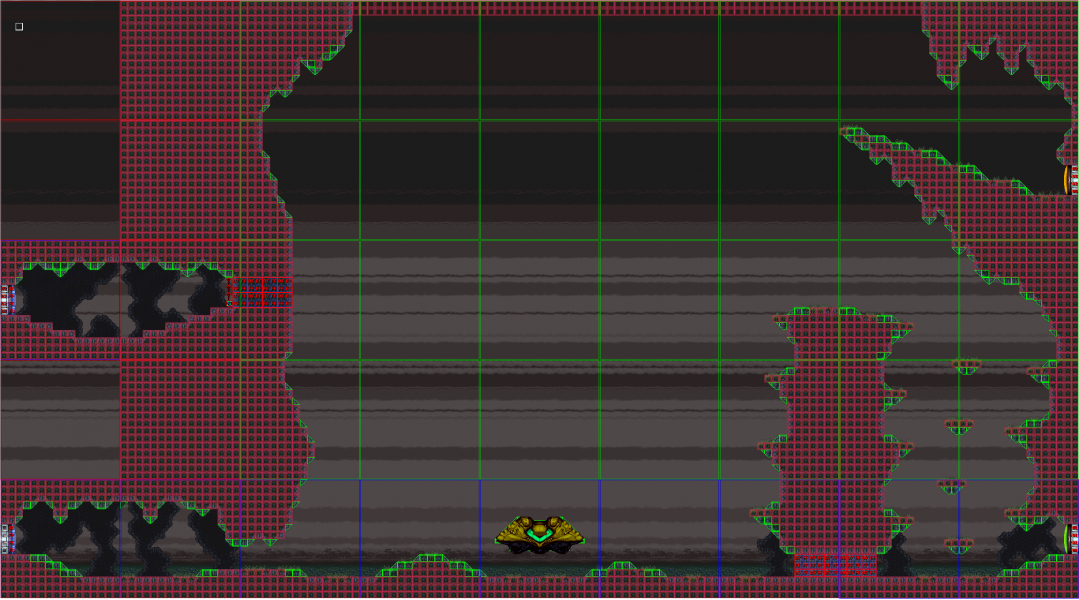
After coming from the Wrecked Ship, perform a shinespark diagonally right from near the ship. This will allow you to get to the ledge up by the Crateria Power Bomb Room. Lay a Power Bomb to open the door, and run through.
After you exit, do a wrap-around shot to open the door to Gauntlet Entrance, then shinespark horizontally left from the pillar below, through that door.
You need around 230-240 health to comfortably clear the Gauntlet Spark. Dropping straight down from the ledge, 228 will end the spark just after breaking the last set of bomb blocks, 234 will align you for the short charge into the next room, and 240 will put you right next to the door if you're not going for the spark. If your health is not optimal for the endpoint you want, you can adjust your starting point forwards or backwards as needed.
If you need to pause during the spark in order to manually activate reserves, you will want to do it early in the spark, or before sparking. Pausing late in the spark could risk going Out of Bounds due to a Doorskip.
If you do accidentally go Out of Bounds here, you can get back in-bounds using this method, which uses similar route through this room as GT Spacetime.
Any% Glitched
After X-Ray Climbing to get Out of Bounds, you will need to navigate to a certain point to activate X-Ray for the purpose of setting the Escape flag. This video shows the route typically taken for this category.
Trivia
During this race dueDillyQueen noticed in chat that the rain is moving opposite directions for the two runners. PJBoy investigated this and found it depends on RNG: the rain's X speed is randomly set to -6, -4, or 6.
