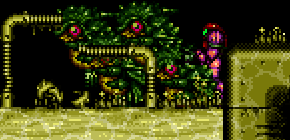
Draygon
| Draygon | |
 |
|
| Location | Draygon's Room, Maridia |
| Health | 6000 |
Most top Super Metroid runners would agree that Draygon is overall the toughest fight to execute completely properly, especially in runs. Any missed timing during the fight can lead to disaster. Do not become discouraged if your ability to execute the fight well feels semi-consistent at best. Simply keep practicing and learning.
Contents
General Information
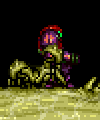
Draygon has 6000 hit points, and her underbelly will change color based on her remaining health:

Draygon's core is vulnerable to Missiles, Super Missiles, charged shots, and special beam attacks.
Draygon is vulnerable to shinespark, pseudo-Screw, and electricity.
Draygon will always begin the fight by swooping from the left to the right.
Draygon will either swoop again or spray mucus after a swoop cycle.
Draygon will never do two mucus cycles back-to-back.
Any part of Draygon's body will deal 40 / 80 / 160 damage to Gravity Suit / Varia Suit / Power Suit Samus, respectively.
Draygon's turrets will deal 32 / 64 / 128 damage with their shots, 4 / 8 / 16 damage when their electricity is touched by Samus's body, and will drain 1 energy per 4 frames / 1 energy per 2 frames / 1 energy per frame when their electricity is touched by Samus's Grapple Beam, to Gravity Suit / Varia Suit / Power Suit Samus, respectively.
Interactions
Swoop
Draygon's swoops can be completely avoided by staying morphed on the ground in one location.
As Draygon's health lowers, the speed of her swoops will increase.
Draygon will appear to swoop much faster (roughly two seconds faster) after a left-to-right mucus cycle than vice-versa.
Draygon's swoops can be taken advantage of by firing into her core as she swings down, then morphing afterward to avoid the swoop, and repeating this process until the swooping ceases. Draygon will be more prone to taking damage in this manner earlier into the fight as Draygon's swooping speed will not be as high.
Mucus
Draygon will release mucus when she becomes visible during this cycle, moving somewhat slowly across the screen while bobbing slightly up and down. This means you will want to be as close to Draygon as possible during the beginning of this cycle so that the mucus spray ends as early as possible.
Draygon can give indications of her performing a mucus cycle after a swoop. She will take longer to appear on-screen compared to a swoop, and will make a noise every time she produces a mucus particle.
Draygon's mucus cycles will last the same amount of time regardless of her health.
Draygon's mucus will drop items when destroyed by beams, Missiles, or Super Missiles.
Power Bombs will destroy all mucus particles within the explosion; however, they will not drop items when destroyed in this manner.
If you are afflicted by a mucus particle, you can remove it with a pseudo-Screw, Screw Attack, blue suit, or shinespark. Draygon will immediately fly directly upwards if this occurs. Alternatively, such as situations where you cannot charge a pseudo-Screw in time, you can try damage boosting off of an exposed turret and/or walljumping away from Draygon until the mucus particle fades.
Draygon's mucus particles will linger for a short period of frames after they have been shot - an indication of this is if you shoot a particle and immediately run into its location, you should appear to have taken a hit. This does not cause damage to Samus, however.
Grab
Draygon will move towards you and attempt to grab you when afflicted by a mucus particle. If the particle disappears, Draygon will fly directly upwards, and then swoop from the left.
Draygon moves upward in a spiral that will become more violent as the upwards movement progresses and will randomly strike Samus with her tail. Mashing on the directional pad will eventually free Samus from the grab, after 60 directional pad inputs have occurred. At the end of the spiral, Draygon will strike Samus multiple times before freeing her, so it is important to force yourself free before this occurs.
Draygon will not always attempt to grab you if you become afflicted by a mucus particle. Sometimes, Draygon will not attempt to grab you if you become afflicted right at the end of Draygon's mucus spray.
If Draygon grabs onto you, you can use the Grapple Beam on an exposed turret to damage Draygon. This is the second fastest method to killing Draygon (third if you include GT Classic's method). Electricity will deal 256 damage to Draygon in a 16-8-8-8 pattern, meaning that in a series of four, the first 256 damage will happen after 16 frames of conductivity, and the remaining three will happen after 8 frames of conductivity. If Draygon is at full health, it will take 238 frames (3.97 seconds) for Draygon to be defeated in this manner. It is easier to grab onto the exposed turrets on the left side with Grapple Beam. If Draygon has returned to the center of the room with Samus and has begun spinning around, it is not possible to grab onto the lower right exposed turret, and the upper right exposed turret can be quite difficult to grab onto, even if you aim at it from above by angling down.
Death
Draygon's corpse can still act as a source of damage for a short period of time after her demise, and this short period can be reset depending on how Samus interacts with Draygon's corpse.
Draygon's corpse must float to the horizontal center of the room before the death animation can proceed. Finishing the fight while Draygon is closer to the center of the room can save time as seen below:
If Draygon dies while considered off-screen on the left side, this will cause Draygon to, instead of sinking back into the center of the sand, move across the entire out of bounds area until she has looped back to the area. She will continue moving left as a corpse until she has looped back to the right, then sink into the sand as she should. Because of how enormous of an area the out of bounds is, this process takes approximately 18 minutes and 10 seconds.
This video shows the wait for Draygon to return in full:
Turret
Draygon's turrets have 300 health each and can only be destroyed by Missiles or Super Missiles.
Every 64 frames, the turret firing routine will randomly select one of the four turrets to charge and fire a shot. Since one of the turrets is inactive and cannot shoot, 25% of the time no turret will shoot. As more turrets are destroyed, those too will be considered inactive and unable to shoot, thus increasing the number of 64 frames intervals where no shots are fired.
The turrets will fire much less often during mucus cycles.
A turret will determine, based on Samus's current position on the frame it begins charging a shot, where to aim the shot. In other words, the turrets will attempt to anticipate Samus's movement and fire accordingly.
Categories
Any% (Beginner)
Consider retrieving extra Super Missiles before reaching Botwoon. Although Any% will always acquire the Wrecked Ship (Left) Super Missile pack, you can also acquire the pack to the right of that location, as well as the "Crab Supers" stowed away to the left of the Maridian mountain (a.k.a. "Mount Doom") that are accessed through a hidden morph tunnel, or the pack in the upper right corner of Aqueduct. If you only want one or two of these packs, the Maridia packs are similar in speed to each other, and both are faster to obtain than the Wrecked Ship (Right) pack; however, acquiring the Aqueduct pack by itself would involve a tight jump over the nearby Missile pack, assuming you did not want to obtain it.
After Botwoon, you can then fill up on Super Missiles from the fish (Zoa) on the right side of the Botwoon Energy Tank Room.
Enter Draygon's room, and use Missiles to destroy the three turrets. Make sure all of your beams are enabled (Charge, Ice, Wave, and Spazer if obtained). Generate a charge with the beam and hold angle up while crouched in the center of the room, facing left. When Draygon swoops, fire the charge shot into her core, immediately morph, unmorph after Draygon passes by, charge the beam up again, and face right while crouched and holding angle up. Repeat this process alternating between directions until a mucus cycle.
A variation of the above strat can follow the charge shot with missiles and super missiles to significantly increase the damage done to Draygon during the first swoop. After destroying the turrets, stand near the right side of the room and charge a shot. When the last Evir in the background disappears, release the charge shot, then move forward slightly, crouch, and begin firing missiles. Once Draygon gets close, switch to supers and fire one, then turn around, move right, and fire two more as she swoops over Samus. Afterwards, continue the fight as normal. Done properly, this opener can deal comparable damage to a shinespark, but with significantly less risk:
As explained previously, there will be both a visual and auditory indicator for the mucus cycle. Lay a Power Bomb near Draygon, then retreat a short distance. After the Power Bomb clears away the mucus, you can freely deposit your ballistics (primarily Super Missiles) into Draygon's core.
If you do not wish to Power Bomb the mucus, or have ran out of Power Bombs, you can also farm the mucus for drops (including Power Bombs). Have Draygon appear on-screen to begin the mucus cycle, then run to the opposite corner and begin firing uncharged beam shots at Draygon's direction. Performing short hops in-between shots should provide additional vertical coverage. Once mucus has been cleared, you should have a chance to get in a few Missiles or Super Missiles before needing to roll under Draygon.
If your health becomes low, you can always morph on top of the sand to avoid swoops and then farm or roll away from mucus.
Any% (Intermediate)
A shinespark opener without the X-Factor used in the optimal strategy can still do 2250 damage. After this, you can go to the side of Draygon's room that she will appear from, and if you hear the mucus cycle start, you can run to the opposite corner. If you're starting to incorporate other shinesparks into the fight, you can charge one at this time. If you fail to charge the spark, or choose not to, then you can shoot the mucus. Since you started the mucus as early as possible during the cycle, this will give you much more time to fire off ordnance after she stops firing mucus. You can also open the damage with a charge shot, jumping over the last of the mucus.
If you spark through Draygon's head from left to right during a right-to-left mucus cycle, you can damage boost off of the bottom right turret to a nice position to fire off missiles upward as you move with her.
If you have Ice/Wave/Spazer equipped and land the shot at the start of the goo phase, or if you have Super Missiles still available, it's possible to kill Draygon during this ballistic phase. Given that Blue Suit only saves a few seconds in Any% KPDR, this might be preferable for some runners compared with waiting to kill Draygon with a spark on a later phase, especially with the health saved in the process.
It's also possible to kill Draygon with three shinesparks and no other damage, but with the ideal Draygon patterns it's only faster if you're able to do two shinesparks in the goo phase, which is very difficult.
Any% (Optimal)
One way to perform the optimal opener for the Draygon fight is the following:
- With Power Bombs selected, begin moving forward to shortcharge a shinespark once the Evirs reach this location:

- Begin charging the beam once Samus reaches this location (on top of the claw):


- After charging the shinespark (once it is possible to do so), have Samus be around this position as the X-Factor is produced:

- Once the X-Factor crosses through Samus, perform a medium spinjump to the right
- Activate the shinespark, and after a short wait (around a quarter of a second), shinespark towards the left
When executed properly, the opener should deal around 3000 damage to Draygon, with the maximum normally being 3450 as shown by the example video. A few runners (video by StaticNine) have hit for 3600, ShinyZeni has a setup that will do this much damage optimally consistently. This more-damaging opener is usually considered suboptimal for modern speedruns, because the extra ammo cost of the 3450 opener is usually negligible when compared to the risk of an overkill and subsequent chain damage from the 3600 opener.
There are a number of ways to perform the actions above with different visual, or even auditory, cues. If you happen to find something that works better for you, use it!
Afterward, two shinesparks should finish Draygon off. Ideally, you would be given a mucus cycle right after the initial swoop, so that you can charge the first of the two shinesparks right before Draygon floats on-screen, and charge the second right after Draygon is done spraying mucus, leaving just enough time to jump and activate it in front of Draygon. This is what is sometimes referred to as "two with blue" (explained in Mackemagi's tutorial at the bottom of the page), which means Draygon is defeated in only two rounds total (one swoop, one mucus).
Draygon's body is made of four distinct hitboxes. The belly hitbox is special: if Samus is touching the belly, then she will not collide with Draygon at all, even if she's touching another hitbox. The hitboxes are not quite symmetrical with Draygon's facing direction:

Draygon takes 150 damage for each frame that Samus is touching at least one of her hitboxes (and not her belly). An optimal shinespark will hit both the top and upper-middle hitboxes to maximize the number of frames that Draygon takes damage.
A potentially faster alternative to performing three shinesparks is to perform two shinesparks and utilize ballistics (primarily Super Missiles) instead of performing a third shinespark. It has the potential to conserve energy at the expense of ammunition, and can guarantee at least a three round kill independent of patterns provided.
Finishing Draygon while in an active shinespark can gift Samus with a blue suit that can be carried to and used at the Colosseum to save substantial time in Any% PRKD, or a few seconds in Any% KPDR. Read more about this here.
Attempting to finish off Draygon with a shinespark comes with a risk from Draygon's "chain damage" effect. This occurs when Samus dies while inside the hitbox of Draygon('s corpse) with blue suit - Draygon will continue dealing damage to Samus until she has exited her hitbox due to the blue suit, which is worsened by blue suit causing Samus to have a much lower invulnerability period than normal. Due to this, it is risky to attempt to shinespark Draygon to finish her off when under a tank of energy and/or in the back of her head, as Draygon will then move backwards into a Samus that was attempting to move forward through Draygon, typically producing a nasty result. Letting go of the dpad can help avoid Samus being damage boosted further inside Draygon's hitbox, while aiming down can compress Samus' hitbox, sometimes causing fewer rounds of chain damage to occur.
Because Blue Suit requires the Dash value to be 0, you can avoid chain damage by killing Draygon with a shinespark after dashing, with no turnaround. This means no Blue Suit to get across Colosseum, but it does at least allow you to finish the fight quickly and survive.
If you fail to gain blue suit after Draygon dies, you can attempt a possible, but rather difficult to execute, backup option known as the "spikesuit." Runners will sometimes choose to turn their Blue Suit into a Spikesuit in order to grab Draygon's drops with minimal time loss, but this carries the risk of losing the Blue Suit if they hit the "bad frame" when attempting it.
This information also applies to the 100% categories.
For Any% PRKD, because of the time save from skipping Space Jump, as well as the time save from skipping Draygon's drops, you want to be more conscious of your energy so that you survive the fight with over 135 energy, along with a blue suit. Having less than 135 energy will cause the shinespark from the blue suit to stop at an earlier point in its flight back across the Colosseum. In the event you have too low of health to reasonably use the blue suit, you will want to acquire Draygon's drops before performing a Gravity Jump to escape Draygon's chamber. Otherwise, you will want to perform an infinite bomb jump as soon as Draygon perishes to reach the upper door as it unlocks, as it is a bit faster than gravitation jumping due to pausing not being required. If your health is close to critically low, then assuming you have enough time to do so, it may be wise to damage yourself against the electricity of Draygon's turrets to bring your health into the critical amount (below 30) such that a "health bomb" is forced for Draygon's drops.
Raindance
An alternate setup for the X-factor starts on the left side, and uses visual cues to time the shot well before you short-charge. Read the description of the video for an explanation of the cues.
2 X-Factor
This video goes over a setup for a second X-factor, which reduces the reliance on other types of ammo. This can make the fight less reliant on drops after Botwoon, and can conserve Supers for Tourian in Any% PRKD.
14% Ice
The optimal opener to use against Draygon is to wait on the edge of the left ledge (next to the Space Jump door), then generate an Ice Shield and morph. Once the first Ice particle connects with Draygon's core, hold right to roll off the ledge, and the remaining particles should connect with Draygon's core without you taking damage from the swoop. You can continue using Ice Shield throughout the fight after mucus cycles.
An efficient way to punish swoops is by using a pseudo-Screw. 200 damage is significant compared to the 90 damage from charged Ice Beam that will, as the fight progresses, be harder to incorporate. Pseudo-Screws will allow you to conserve your Missiles and Super Missiles for the ends of mucus cycles, where Draygon will be moving slowly without protection. Pseudo-Screws consume 40 energy per application, but your energy is mostly free to expend during the fight, as you should receive it back either from Draygon's drops, the Zebbos that spawn at the Red Brinstar <-> Maridia connector area, or the Gunship. You shouldn't need much energy to survive the trek back to Crateria after the fight.
Try to keep track of how much damage you have inflicted to Draygon over the course of the fight so you will know when you can potentially finish her off at the end of a mucus cycle with the remainder of your ammo, rather than allow her to perform more swoops.
You have the option to leave a turret or multiple turrets up during the fight to give yourself more ammunition to work with, but it is obviously not recommended for inexperienced players to do so.
14% Speed
Just like Any%, the shinespark is your strongest weapon. Due to lacking Wave Beam, your opener should simply be a shinespark. Three well-placed shinesparks can slay Draygon; however, it will be more difficult than in Any% to execute the shinesparks due to lacking Hi-Jump Boots. It is recommended that you hold angle down before jumping into the air to shinespark so that you have more height than if you ran and spinjumped before shinesparking - the Speed Booster by itself will substantially reduce the height of your running jumps. Angle down can also prevent accidental early shinespark activations as a shinespark cannot activate while angle down is being held.
Super Missiles are the next best weapon to use against Draygon, especially if you cannot get a shinespark off for whatever reason.
Just like Any%, you should be attempting to gain blue suit when the fight ends, and can attempt the "spikesuit" backup in case one is not gained.
Reverse Boss Order
You will want to be at a low energy amount before entering Draygon's chamber since you will be performing a Crystal Flash mid-fight. Most people connect to a turret using Grapple Beam to drain away some health, then have Draygon strike them once to reduce their health to the appropriate amount.
You can open the fight with a handful of Missiles and/or Super Missiles if you so desire.
You will want to preemptively place a Power Bomb down (for Crystal Flash) before Draygon begins a mucus cycle. You may need to react quickly to not hearing a mucus cycle being performed so that you do not accidentally Crystal Flash during a swoop.
Draygon interrupting a Crystal Flash by grabbing onto Samus will gift Samus with a shinespark suit. After this occurs, break free of Draygon.
Wait on Draygon to perform another mucus cycle. Right before Draygon would grab onto Samus, activate the shinespark suit. If executed properly, Samus should now have a blue suit due to Draygon interrupting the shinespark with another grab. From here, wait until Draygon swings into the appropriate position, then activate the Grapple Beam to latch onto a turret and electrocute Draygon.
Afterward, you may collect Draygon's drops or ignore them, then acquire Space Jump. Once back inside Draygon's chamber, you will want to perform infinite grapple jumps off the lower right turret to return to the door above. It should only take three to gain enough height with which to reach the ledge. Use the shinespark from the blue suit to escape Draygon's entry chamber. The second block on the pipe floor provides a great visual cue for doing so.
If you are having difficulty performing the infinite grapple jumps necessary for escaping, you may find it worthwhile to maintain enough ammo to be able to perform a Crystal Flash to regain health so you can continue attempting the infinite grapple jumps.
Alternate strategies to the Draygon fight that involve having shinespark suit after Draygon perishes instead of blue suit will need to be careful not to accidentally activate the shinespark suit during the infinite grapple jumps.
Attempting to kill Draygon with the shinespark suit to generate a blue suit is extremely risky due to chain damage in this category, but is technically an option.
If you're unlucky, Draygon's goo might miss Samus while she is in crystal flash. If this happens, Samus will likely die due to chain damage (since Samus has no iframes in crystal flash). The chances of a successful goop ranges between 67% to 99.997% depending on Samus's position in the room and the direction Draygon is gooping from. The below color-coded image indicates the odds of a successful goop for each position in the room (green means Samus is more likely to be grabbed by Draygon from this position).


GT Classic
Having the items from GT Code allows for the X-Plasma exploit to be performed by activating X-Ray Scope multiple times as a charged Ice/Wave/Plasma shot passes through Draygon's core.
Since charged Ice/Wave/Plasma deals 900 damage, you can slay Draygon in this manner with only one charge shot with proper X-Ray Scope activations.
Tutorials
Garrison - Provides players with a place to begin for learning Draygon in Any%. (0:00 to 4:30 - beginner strategy | 4:30 to 12:00 - "my first shinespark" | 12:00 - 17:20 - advanced strategy | 17:20 to end - blue suit)
Mackemagi - Explains "two with blue" strategy. (0:00 to 2:40 - X-Factor and damage avoidance | 2:40 to 3:55 - optimizing first shinespark | 3:55 to 5:00 - optimizing second shinespark | 5:00 to 6:00 - optimizing third shinespark | 6:00 to end - "what if things go wrong?")
DbX - Explains methods for how to X-Factor not only Draygon, but Phantoon and Botwoon as well.
You may also want to check out any recent Any% or 100% tutorials as they should cover Draygon in a similar manner.